The December cumulative update that was released on the 18th of December 2008 has been re-released. There were many reports amongst the community of errors involved during the update. I myself ran into the old 'Upgrade failed to initialize' error that ocured after running the SharePoint Products and Technologies Configuration Wizard. Lucky I ran this update in a test environment first. Microsoft have also stated that it is recommended to wait till SharePoint SP2 which will be released early next year.
I found the Cumulative Update a good option if you haven't installed the infrastructure update yet, as this update includes the infrastructure update.
As always make sure you have installed Service pack 1 for WSS 3.0 and MOSS 2007 (if you are running MOSS 2007).
Here are the December Updates:
Windows SharePoint Services 3.0 December Cumulative Update
Microsoft Office SharePoint Server 2007 December Cumulative Update
You can find the Microsoft SharePoint team blog post regarding this here:
http://blogs.msdn.com/sharepoint/archive/2008/12/17/announcing-december-cumulative-update-for-office-sharepoint-server-2007-and-windows-sharepoint-services-3-0.aspx
Monday, December 29, 2008
Thursday, December 18, 2008
Finally. PDF iFilter 64bit. Tested and Working.
Well it has been a long time coming, but Adobe Labs have finally released a 64bit version of the PDF iFilter. With 64bit Server architecture becoming more and more common, this is clearly essential for your Microsoft Office SharePoint Server 2007 Search.
Here is the link to download the ifilter:
http://www.adobe.com/support/downloads/detail.jsp?ftpID=4025
And the instructions to Install it:
Configuring Adobe PDF iFilter 9 for 64-bit platforms for MS SharePoint 2007 Note: The steps mentioned below are as per suggested by Microsoft. Please refer to links below for appropriate Microsoft KB articles.
http://support.microsoft.com/?id=555209
1. Install Adobe PDF iFilter 9 for 64-bit platforms.
http://blogs.msdn.com/ifilter/archive/2007/03/29/indexing-pdf-documents-with-adobe-reader-v-8-and-moss-2007.aspx
2. Verify that PDF has been added to the registry.
a. Run Regedit by browsing to c:\Windows\system32\regedt32.exe and double-clicking it.
b. Within left-side tree, browse to: \\HKEY_LOCAL_MACHINE\SOFTWARE\Microsoft\Office Server\12.0\Search\Applications\{site GUID}\Gather\Portal_Content\Extensions\ExtensionList
c. If PDF extension is present, skip to Step 3 . If PDF extension is not present, continue with Step d.
d. Right click on right-side Extension List pane and choose New > String Value
e. Add a name to the new Registry Key (e.g. “38”)
f. Double click the new Registry Key. For “Value data”, enter “pdf”
Note: This can also be achieved via SharePoint Server Search Administration page by adding ‘pdf’ to list of File Types in Search Administration->File Types. This would automatically add an entry for ‘pdf’ filetype as mentioned above in step 1
3. Verify that PDF has the correct settings in a second registry location.
a. While still in Regedit, within the left-side tree, browse to: \\HKEY_LOCAL_MACHINE\SOFTWARE\Microsoft\Office Server\12.0\Search\Setup\Filters\.pdf
b. Verify the following values. If values are not as shown, edit them.
i. Default =
ii. Extension = pdf
iii. FileTypeBucket = 1
iv. MimeTypes = application/pdf
4. Verify that PDF has the correct settings in a third registry location.
a. While still in RegEdit, within the left-side tree, browse to: \\HKEY_LOCAL_MACHINE\SOFTWARE\Microsoft\Office Server\12.0\Search\Setup\ContentIndexCommon\Filters\Extension\.pdf
b. Verify the following values. If values are not as shown, edit them.
i. Default = {E8978DA6-047F-4E3D-9C78-CDBE46041603}
5. Verify that pdf.gif is present at the following location:
C:\Program Files\Common Files\Microsoft Shared\web server extensions\12\TEMPLATE\IMAGES
6. Add an entry in docicon.xml for the pdf icon:
C:\Program Files\Common Files\Microsoft Shared\Web Server Extensions\12\TEMPLATE\XML
Note: Step 4 & 5 are done in order to have the pdf icon in SharePoint while it displays the search results.
7. Restart all SharePoint services as well as IIS.
a. Launch the DOS Shell (Start > All Programs > Accessories > Command Prompt).
b. Type the following at the prompt: “net stop osearch”. Wait for success message.
c. Type the following at the prompt: “net start osearch”. Wait for success message.
d. Type the following at the prompt: “iisreset”. Wait for success message.
Close the Command Prompt window.
8. Microsoft Office SharePoint Server can now index PDF files. Also, PDF icon should show in File Types list
These above instructions can be found here.
I currently have this working on a production environment as opposed to installing the Foxit 64bit PDF ifilter. Nice work Adobe.
Here is the link to download the ifilter:
http://www.adobe.com/support/downloads/detail.jsp?ftpID=4025
And the instructions to Install it:
Configuring Adobe PDF iFilter 9 for 64-bit platforms for MS SharePoint 2007 Note: The steps mentioned below are as per suggested by Microsoft. Please refer to links below for appropriate Microsoft KB articles.
http://support.microsoft.com/?id=555209
1. Install Adobe PDF iFilter 9 for 64-bit platforms.
http://blogs.msdn.com/ifilter/archive/2007/03/29/indexing-pdf-documents-with-adobe-reader-v-8-and-moss-2007.aspx
2. Verify that PDF has been added to the registry.
a. Run Regedit by browsing to c:\Windows\system32\regedt32.exe and double-clicking it.
b. Within left-side tree, browse to: \\HKEY_LOCAL_MACHINE\SOFTWARE\Microsoft\Office Server\12.0\Search\Applications\{site GUID}\Gather\Portal_Content\Extensions\ExtensionList
c. If PDF extension is present, skip to Step 3 . If PDF extension is not present, continue with Step d.
d. Right click on right-side Extension List pane and choose New > String Value
e. Add a name to the new Registry Key (e.g. “38”)
f. Double click the new Registry Key. For “Value data”, enter “pdf”
Note: This can also be achieved via SharePoint Server Search Administration page by adding ‘pdf’ to list of File Types in Search Administration->File Types. This would automatically add an entry for ‘pdf’ filetype as mentioned above in step 1
3. Verify that PDF has the correct settings in a second registry location.
a. While still in Regedit, within the left-side tree, browse to: \\HKEY_LOCAL_MACHINE\SOFTWARE\Microsoft\Office Server\12.0\Search\Setup\Filters\.pdf
b. Verify the following values. If values are not as shown, edit them.
i.
ii.
iii.
iv.
4. Verify that PDF has the correct settings in a third registry location.
a. While still in RegEdit, within the left-side tree, browse to: \\HKEY_LOCAL_MACHINE\SOFTWARE\Microsoft\Office Server\12.0\Search\Setup\ContentIndexCommon\Filters\Extension\.pdf
b. Verify the following values. If values are not as shown, edit them.
i.
5. Verify that pdf.gif is present at the following location:
C:\Program Files\Common Files\Microsoft Shared\web server extensions\12\TEMPLATE\IMAGES
6. Add an entry in docicon.xml for the pdf icon:
C:\Program Files\Common Files\Microsoft Shared\Web Server Extensions\12\TEMPLATE\XML
Note: Step 4 & 5 are done in order to have the pdf icon in SharePoint while it displays the search results.
7. Restart all SharePoint services as well as IIS.
a. Launch the DOS Shell (Start > All Programs > Accessories > Command Prompt).
b. Type the following at the prompt: “net stop osearch”. Wait for success message.
c. Type the following at the prompt: “net start osearch”. Wait for success message.
d. Type the following at the prompt: “iisreset”. Wait for success message.
Close the Command Prompt window.
8. Microsoft Office SharePoint Server can now index PDF files. Also, PDF icon should show in File Types list
These above instructions can be found here.
I currently have this working on a production environment as opposed to installing the Foxit 64bit PDF ifilter. Nice work Adobe.
Friday, November 28, 2008
SharePoint Infrastructure Update Broke my Search... Twice!
Good Evening Ladies and Gentlemen,
It appears that the Windows SharePoint Services 3.0 Infrastructure Update and Microsoft Office SharePoint Server 2007 Infrastructure Update, which can be found announced here, has broken my search on two seperate occasions in two different environment, one being a multi server farm (2 web front ends, one application server, seperate SQL), one being a Single Server farm (which hosts SQL) and even a UAT environment which lives on two servers.
The issue I have experienced consistent in all of these cases is that after installing the Infrastructure updates I get this Error:
The start addresscannot be crawled.
Access is denied. Check that the Default Content Access Account has access to this content, or add a crawl rule to crawl this content.
This is strange because I did a test crawl before applying the update and it works fine. Checking the crawl logs states that my account domain\sp_content is infact throwing an access denied error. Oh the frustration!
So I did some digging around on the internet and ended up stumbling across this:
http://support.microsoft.com/kb/896861
Basically you have to disable the loopback check, this is done in the registry of your index/ssp server.
Open up RegEdit by clicking Start, click Run, type regedit, and then click OK.
This should now fix your issue!
It appears that the Windows SharePoint Services 3.0 Infrastructure Update and Microsoft Office SharePoint Server 2007 Infrastructure Update, which can be found announced here, has broken my search on two seperate occasions in two different environment, one being a multi server farm (2 web front ends, one application server, seperate SQL), one being a Single Server farm (which hosts SQL) and even a UAT environment which lives on two servers.
The issue I have experienced consistent in all of these cases is that after installing the Infrastructure updates I get this Error:
The start address
Access is denied. Check that the Default Content Access Account has access to this content, or add a crawl rule to crawl this content.
This is strange because I did a test crawl before applying the update and it works fine. Checking the crawl logs states that my account domain\sp_content is infact throwing an access denied error. Oh the frustration!
So I did some digging around on the internet and ended up stumbling across this:
http://support.microsoft.com/kb/896861
Basically you have to disable the loopback check, this is done in the registry of your index/ssp server.
Open up RegEdit by clicking Start, click Run, type regedit, and then click OK.
- In Registry Editor, locate and then click the following registry key:
HKEY_LOCAL_MACHINE\SYSTEM\CurrentControlSet\Control\Lsa - Right-click Lsa, point to New, and then click DWORD Value.
- Type DisableLoopbackCheck, and then press ENTER.
- Right-click DisableLoopbackCheck, and then click Modify.
- In the Value data box, type 1, and then click OK.
- Quit Registry Editor, and then restart your computer.
This should now fix your issue!
Thursday, October 23, 2008
SharePoint Virtualisation Support yay!
Bit late on this one, as I thought I already had blogged this. A big bonus for us SharePoint people who love to use virtual environments.
http://blogs.msdn.com/sharepoint/archive/2008/08/18/update-on-virtualization-support-for-sharepoint-products-and-technologies.aspx
SharePoint is now fully supported in virtual environments! Go Hyper-V Go!
http://blogs.msdn.com/sharepoint/archive/2008/08/18/update-on-virtualization-support-for-sharepoint-products-and-technologies.aspx
SharePoint is now fully supported in virtual environments! Go Hyper-V Go!
Moving the Windows Internal Database
One big issue I have seen quite a bit of is that the Windows internal database that is stored within SharePoint is kept on the C: Drive. This can cause issues as most application servers have drive partitions that look similar to this:
C:\ Drive (Operating System) - 40gb
D:\ Drive (Data) - 160gb
Or something of that nature. Using Microsoft best practice the rough calculation to decide upon SharePoint database size is to take the corpus size (data size of all your content) and multiply this by 1.75. This will allow enough room for log files and also the search space requirements.
The issue with the Windows Internal database is the default database location is set to c:\windows\sysmsi\ssee\mssql.2005\mssql\data .
You can imagine the issues if you load 80gb of documents into SharePoint.
So here is what to do to move the databases, I would suggest moving them all however you can get away with moving just the content database and the search database.
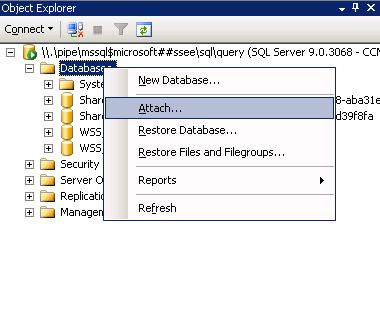
1. First step is to either stop the SQL service or the SharePoint services (there are around 5). It is up to you which one to stop just make sure you have informed your users and also stopped the SharePoint IIS web site.
2. Next You will need to detach the database from SQL.
3. Open the SQL Management Studio as explained in my previous post and connect to the Windows Internal Database.
4. Expand databases and the Right click on the database you want to move, in this case WSS_Content, click on tasks and click on detach.

5. Now you can go into the c:\windows\sysmsi\ssee\mssql.2005\mssql\data folder and copy the physical database files. Make sure you copy BOTH files --> MDF and LDF.
6. Copy the files to an appropriate location (such as d:\sharepoint\data or d:\databases\sharepoint).
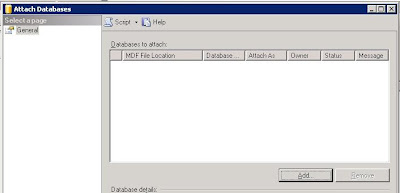
7. Go Back into Microsoft SQL Management Studio and Right Click on Databases and Click on Attach.
8. Now all youy have to do is click on 'Add' and then browse to the location you copied your WSS_Content database files to and add the MDF file (SQL will automatically pick up the LDF file).
9. Restart the SharePoint or SQL Services and then retart the IIS web sites.
10. The databases are now successfully migrated to a new location.
Repeat these steps for your search and admin config databases if you so chose.
Good Luck!
C:\ Drive (Operating System) - 40gb
D:\ Drive (Data) - 160gb
Or something of that nature. Using Microsoft best practice the rough calculation to decide upon SharePoint database size is to take the corpus size (data size of all your content) and multiply this by 1.75. This will allow enough room for log files and also the search space requirements.
The issue with the Windows Internal database is the default database location is set to c:\windows\sysmsi\ssee\mssql.2005\mssql\data .
You can imagine the issues if you load 80gb of documents into SharePoint.
So here is what to do to move the databases, I would suggest moving them all however you can get away with moving just the content database and the search database.
1. First step is to either stop the SQL service or the SharePoint services (there are around 5). It is up to you which one to stop just make sure you have informed your users and also stopped the SharePoint IIS web site.
2. Next You will need to detach the database from SQL.
3. Open the SQL Management Studio as explained in my previous post and connect to the Windows Internal Database.
4. Expand databases and the Right click on the database you want to move, in this case WSS_Content, click on tasks and click on detach.

5. Now you can go into the c:\windows\sysmsi\ssee\mssql.2005\mssql\data folder and copy the physical database files. Make sure you copy BOTH files --> MDF and LDF.
6. Copy the files to an appropriate location (such as d:\sharepoint\data or d:\databases\sharepoint).
7. Go Back into Microsoft SQL Management Studio and Right Click on Databases and Click on Attach.

8. Now all youy have to do is click on 'Add' and then browse to the location you copied your WSS_Content database files to and add the MDF file (SQL will automatically pick up the LDF file).

9. Restart the SharePoint or SQL Services and then retart the IIS web sites.
10. The databases are now successfully migrated to a new location.
Repeat these steps for your search and admin config databases if you so chose.
Good Luck!
SharePoint Windows Internal Database
A lot of the time when clients cannot afford SQL 2005 standard, SharePoint usually gets installed as a single server farm with an Windows Internal Database. The windows internal database is actually a version of SQL 2005 Express edition. It is actually preferable to use this internal database over a copy of SQL 2005 Express edition because you are not limited to 4gb with the internal database, as you would be if you used an external SQL 2005 Express instance.
Always keep in mind that you can connect to the Internal database using SQL Management studio express found here:
http://www.microsoft.com/downloads/details.aspx?FamilyId=C243A5AE-4BD1-4E3D-94B8-5A0F62BF7796&displaylang=en
When you download this you can connect to windows internal database by using the following server name:
\\.\pipe\mssql$micrsoft##ssee\sql\query
This will enable you to see the databases used inside the windows internal database. This is exactly the same as if you were using a standard version of SQL.
Enjoy!
Thursday, August 21, 2008
Relocation...
Hello World! I haven't posted in a while for one very good reason. I have been on Holiday in the USA and my honeymoon in Malaysia. The trip was awesome and my wife and I had a fantastic time. Interviewed my brother in law on the state of SharePoint in the California and was informed that SharePoint was traveling strong in the companies which he deals with. However one thing that did strike me was that most of the implementations there were Vanilla and had no customization whatsoever, which is a bit of a shame because it seems that the businesses are not sculpting the product to their corporate culture and identity. It is still good to see that the product is being used. The other big chunk of news is my relocation from Perth to Brisbane! So I will be conducting my SharePoint career from the East Coast. Until next time!
Wednesday, July 9, 2008
Infopath and SharePoint. My Preferred method.
There are many ways to deploy InfoPath forms to SharePoint Server 2007 (enterprise edition) using InfoPath forms services. Over the last year I have had many requests to create InfoPath form solutions to streamline business processes. Conducting research, reading other blogs and general experience has led me to develop a methodology I like to follow when creating forms. This blog post is more about the methodology and reasoning behind the way I like to create InfoPath form Libraries. I wont go into too much detail about how to create InfoPath forms, but more on the best structure to use.
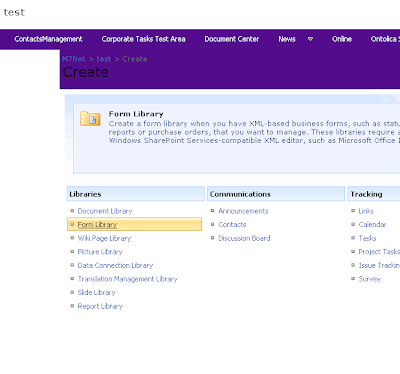
1. First we start with a Site of some sort (this may be a Sub Site). In this instance we are going to create a two Form Libraries (in this case my Subsite is called 'test' which is http://m7net/test). Click on Site Actions > Create (or View all site content > Create) and click on 'Form Library' under Libraries. Give the Form Library a name such as "Forms" or "Form templates" and click Create.
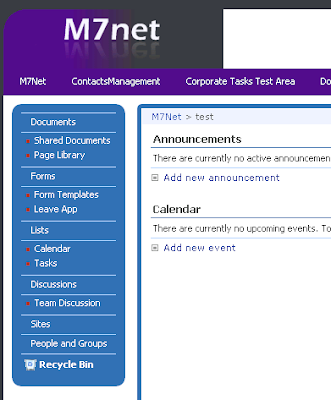
Once you have done this we are going to create another form library with the name synonymous to the form you are going to create. The idea of this is to have all of your forms templates in one library and then the submission library (ie: the library where you specify the form to submit to) named as the form you are creating. In this case I am going to create a pseudo leave application request form, so I will create another form library called 'Leave App'.
So now you should have two form libraries as can be seen below. You can add a quick launch heading called "Forms" if you like to organize your quick links (as I have done).
2. The next step is to create the InfoPath form itself.
Always remember: When creating InfoPath forms it is important to write out and plan the required data sources.
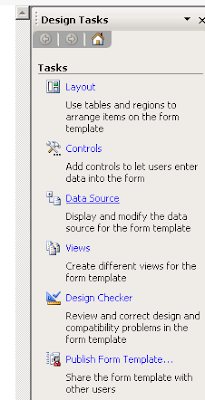
Start by creating the data sources you need. First click on 'Data Source' under the design tasks in the right hand pane.
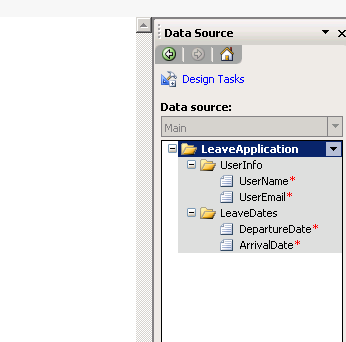
3. Go Ahead and create the fields you require for your and remember to give them an appropriate name and Type. Also you can check 'cannot be blank'. At this point you may want to also create some 'groups' to group your fields. This is done in the same way you create the fields, except change the 'Type' to be 'Group' instead of 'Field'. So you could have a group called 'LeaveDates' then have two fields as children of that group names 'DepartureDate' and 'ArrivalDate' for example.
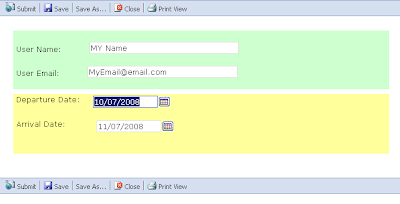
The best method is to rename the 'myFields' to something more relevant (in this case 'LeaveApplication') and then create sub groups to 'hold' your fields. This is a great way to structure the data and also create 'sections' in your form. Sectioning allows you to create repeating sections and organize your form easier. In the example here I have created two sub groups named 'UserInfo' and 'LeaveDates' with fields 'UserName' (Datatype: text string), 'UserEmail' (Datatype: text string), 'DepartureDate' (Datatype: date) and 'ArrivalDate' (Datatype: date) respectively.
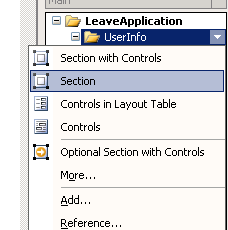
4. Right click on each of your groups (Except the top parent group 'LeaveApplication') and click on 'Add Section' this will add sections to your form.
5. Now right click on the fields that you have added and select which type of field input you would like users to use. So right click on the 'UserName' field and click on 'Text Box', also right click on your date fields and click on 'Date Picker' this adds input fields to your form and automatically associates them with your data source. You should have a basic form that looks like this (if you are following this guide like for like).
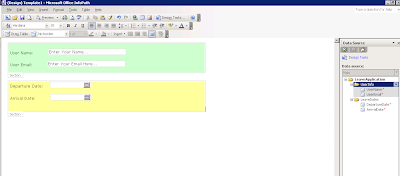
Hint: You can modify the formatting, borders and shading of a section as I have done in the above image.
6. You can add as many sections fields and views as you like, however for the purpose of this blog I will stick to this basic 4 field form. The first thing to do is change the form options to enable this form to be filled out in a browser and also modify the submit options to submit into our 'Leave App' form library. (For an in depth look at changing views on forms check out Andrew Florendine's Blog which has a fantastic posting regarding InfoPath form views).
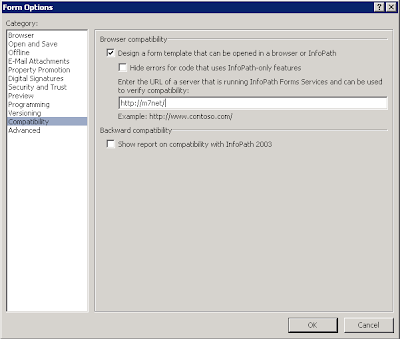
7. Once you are satisfied with your form click on tools > form options. click on 'Compatibility' and then check the option to 'Design a form template that can be opened in a browser...'. Type in your SharePoint server name here to check for compatibility. Click ok when you are done.
8. Now to tell the form to submit to the other document library. Click Tools > Submit Options. Check 'Allow Users to submit this form', change the drop down to a 'SharePoint document library' and click on 'Add...' to add a new data connection.
Enter the document library (http://m7net/test/Leave%20App/ in my case) and also create a concat for the default document name (I have used concat("Leave Application -", UserName) however it would be beneficial to put a date in the concat). Click next and then rename your data connection from 'Main Submit' to 'SharePoint Submit'.
9. Click on File > Publish. If you haven't saved the file yet InfoPath will prompt you to do so. Once you have saved the file to a location, the publish window will come up. Check the option box 'To a SharePoint server...' click next. Type in your server name and click next. Check 'Enable this form to be filled out in a browser' also check the 'Administrator Approved form template (advanced)' option and click next. Pick a file location and click next (make sure you pick a relevant file location, for instance if your working of c:\development\forms, save the file to c:\development\forms\deployment\_V1 or whatever you like). The next screen allows you to promote fields out of your InfoPath form into columns in your SharePoint form library. Go ahead and pick the fields you want to promote and click next.

Click publish.
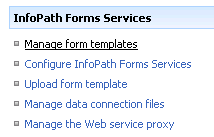
10. Now the next step is to upload the template and add it to your document library. Open central administrator, click on Applications and under InfoPath Forms Services click on 'Manage form templates'.
11. Click on 'Upload Template' and browse to where you published your form template. Once you have found your form click 'Upload'.
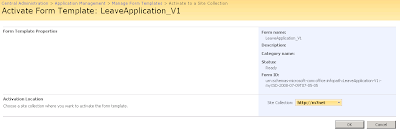
12. Now your form is uploaded, click on the form and click on 'Activate to a Site Collection'. Change 'Activation Location' to your Site Collection and click ok.
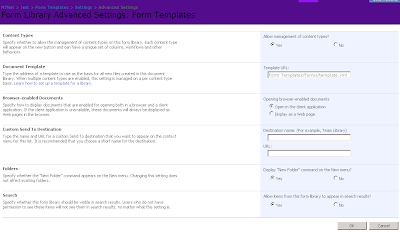
13. Now it is time to add your newly uploaded form template to your 'Form Templates' document library. Click on your form template library (in my case 'Form Templates'). Click on 'Library Settings' then click on 'Advanced Settings'. On this new screen click on 'Yes' under 'Allow management of content types?' and click on 'Display as a Web Page' then click on 'Ok'.
14. Click on 'Add from existing site content types'.
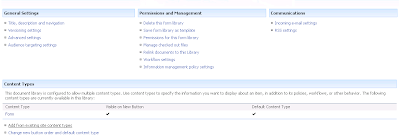
15. Select the form you have activated in the previous steps, click on 'add' and then click on 'ok'.
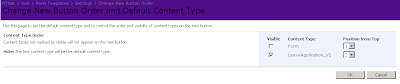
16. Now click on 'Change New Button Order and Default Content Type' just below where you clicked on 'Add from existing content types', uncheck the 'Form' option and click on 'Ok'.
17. Before we can test the form we need to add the columns we have promoted to the form library. Click on the 'Form Library Settings' and under Columns click on 'Add from Existing Site Columns'.
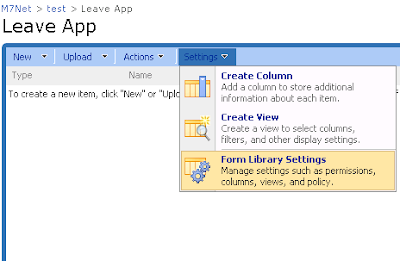
Click on the drop down box and select 'Microsoft InfoPath', this will give you the columns that you have promoted from the fields in your InfoPath form. Select them and click on 'Add' to move them to the right pane. When you are done click ok.

18. Now go back to your Form Templates form library and create a new form by clicking the 'New' and selecting your form. Please keep in mind that this new form page is linkable by copying the URL in the address bar when you have the form open. This means that you can create links within your SharePoint site that link directly to this form.
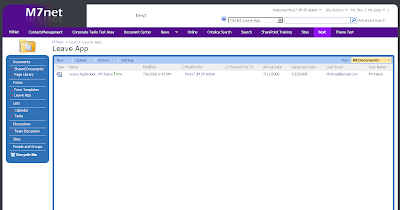
19. Once you have submitted the form go to the 'Leave Application' document library (the library where you set the form to submit to) and review the form, notice that the fields have been promoted into the columns. You can now create and modify views to suite which data you would like to expose.
The Reason I like to do it this way:
The reason I prefer to use administrator approved templates rather than just publishing the form directly to a library is because if you publish straight to a library and then create a new version of the form and upload it, SharePoint creates duplicate columns promoted form your new form. These columns are then un-deletable and you are stuck with 2 or 3 (if not more) un-deletable columns in your column gallery (which is very annoying). Also the reasoning behind separating your template form library and your submission document library is for security purposes, this allows you to manage the permissions of the submission libraries separate to the template library. This also allows you to keep the templates separate to your form libraries. This in my mind is a cleaner way of doing things, however it is also acceptable to load the templates into their respective submission libraries.
1. First we start with a Site of some sort (this may be a Sub Site). In this instance we are going to create a two Form Libraries (in this case my Subsite is called 'test' which is http://m7net/test). Click on Site Actions > Create (or View all site content > Create) and click on 'Form Library' under Libraries. Give the Form Library a name such as "Forms" or "Form templates" and click Create.

Once you have done this we are going to create another form library with the name synonymous to the form you are going to create. The idea of this is to have all of your forms templates in one library and then the submission library (ie: the library where you specify the form to submit to) named as the form you are creating. In this case I am going to create a pseudo leave application request form, so I will create another form library called 'Leave App'.
So now you should have two form libraries as can be seen below. You can add a quick launch heading called "Forms" if you like to organize your quick links (as I have done).

2. The next step is to create the InfoPath form itself.
Always remember: When creating InfoPath forms it is important to write out and plan the required data sources.
Start by creating the data sources you need. First click on 'Data Source' under the design tasks in the right hand pane.

3. Go Ahead and create the fields you require for your and remember to give them an appropriate name and Type. Also you can check 'cannot be blank'. At this point you may want to also create some 'groups' to group your fields. This is done in the same way you create the fields, except change the 'Type' to be 'Group' instead of 'Field'. So you could have a group called 'LeaveDates' then have two fields as children of that group names 'DepartureDate' and 'ArrivalDate' for example.
The best method is to rename the 'myFields' to something more relevant (in this case 'LeaveApplication') and then create sub groups to 'hold' your fields. This is a great way to structure the data and also create 'sections' in your form. Sectioning allows you to create repeating sections and organize your form easier. In the example here I have created two sub groups named 'UserInfo' and 'LeaveDates' with fields 'UserName' (Datatype: text string), 'UserEmail' (Datatype: text string), 'DepartureDate' (Datatype: date) and 'ArrivalDate' (Datatype: date) respectively.

4. Right click on each of your groups (Except the top parent group 'LeaveApplication') and click on 'Add Section' this will add sections to your form.

5. Now right click on the fields that you have added and select which type of field input you would like users to use. So right click on the 'UserName' field and click on 'Text Box', also right click on your date fields and click on 'Date Picker' this adds input fields to your form and automatically associates them with your data source. You should have a basic form that looks like this (if you are following this guide like for like).

Hint: You can modify the formatting, borders and shading of a section as I have done in the above image.
6. You can add as many sections fields and views as you like, however for the purpose of this blog I will stick to this basic 4 field form. The first thing to do is change the form options to enable this form to be filled out in a browser and also modify the submit options to submit into our 'Leave App' form library. (For an in depth look at changing views on forms check out Andrew Florendine's Blog which has a fantastic posting regarding InfoPath form views).
7. Once you are satisfied with your form click on tools > form options. click on 'Compatibility' and then check the option to 'Design a form template that can be opened in a browser...'. Type in your SharePoint server name here to check for compatibility. Click ok when you are done.

8. Now to tell the form to submit to the other document library. Click Tools > Submit Options. Check 'Allow Users to submit this form', change the drop down to a 'SharePoint document library' and click on 'Add...' to add a new data connection.
Enter the document library (http://m7net/test/Leave%20App/ in my case) and also create a concat for the default document name (I have used concat("Leave Application -", UserName) however it would be beneficial to put a date in the concat). Click next and then rename your data connection from 'Main Submit' to 'SharePoint Submit'.
9. Click on File > Publish. If you haven't saved the file yet InfoPath will prompt you to do so. Once you have saved the file to a location, the publish window will come up. Check the option box 'To a SharePoint server...' click next. Type in your server name and click next. Check 'Enable this form to be filled out in a browser' also check the 'Administrator Approved form template (advanced)' option and click next. Pick a file location and click next (make sure you pick a relevant file location, for instance if your working of c:\development\forms, save the file to c:\development\forms\deployment\

Click publish.
10. Now the next step is to upload the template and add it to your document library. Open central administrator, click on Applications and under InfoPath Forms Services click on 'Manage form templates'.

11. Click on 'Upload Template' and browse to where you published your form template. Once you have found your form click 'Upload'.
12. Now your form is uploaded, click on the form and click on 'Activate to a Site Collection'. Change 'Activation Location' to your Site Collection and click ok.

13. Now it is time to add your newly uploaded form template to your 'Form Templates' document library. Click on your form template library (in my case 'Form Templates'). Click on 'Library Settings' then click on 'Advanced Settings'. On this new screen click on 'Yes' under 'Allow management of content types?' and click on 'Display as a Web Page' then click on 'Ok'.

14. Click on 'Add from existing site content types'.

15. Select the form you have activated in the previous steps, click on 'add' and then click on 'ok'.
16. Now click on 'Change New Button Order and Default Content Type' just below where you clicked on 'Add from existing content types', uncheck the 'Form' option and click on 'Ok'.

17. Before we can test the form we need to add the columns we have promoted to the form library. Click on the 'Form Library Settings' and under Columns click on 'Add from Existing Site Columns'.

Click on the drop down box and select 'Microsoft InfoPath', this will give you the columns that you have promoted from the fields in your InfoPath form. Select them and click on 'Add' to move them to the right pane. When you are done click ok.

18. Now go back to your Form Templates form library and create a new form by clicking the 'New' and selecting your form. Please keep in mind that this new form page is linkable by copying the URL in the address bar when you have the form open. This means that you can create links within your SharePoint site that link directly to this form.

19. Once you have submitted the form go to the 'Leave Application' document library (the library where you set the form to submit to) and review the form, notice that the fields have been promoted into the columns. You can now create and modify views to suite which data you would like to expose.

The Reason I like to do it this way:
The reason I prefer to use administrator approved templates rather than just publishing the form directly to a library is because if you publish straight to a library and then create a new version of the form and upload it, SharePoint creates duplicate columns promoted form your new form. These columns are then un-deletable and you are stuck with 2 or 3 (if not more) un-deletable columns in your column gallery (which is very annoying). Also the reasoning behind separating your template form library and your submission document library is for security purposes, this allows you to manage the permissions of the submission libraries separate to the template library. This also allows you to keep the templates separate to your form libraries. This in my mind is a cleaner way of doing things, however it is also acceptable to load the templates into their respective submission libraries.
Tuesday, July 1, 2008
Hyper-V Out and About

I am a bit slow on the uptake as this happened a few days ago, but Hyper-V has been officially released in all it's glory.
Go here to check it out.
The reason for my delayed reaction and inability to even test this release is because I am moving my SharePoint and business intelligence ventures to the east coast (Brisbane to be exact). Because of the move my wife's machine slash my virtual server ;) has been boxed up and shipped away as we have moved into my temporary abode.
I will post an update once I have upgraded and ran some testing.
Tuesday, June 24, 2008
Cloning Virtual Machine's in Hyper V
I am still in the process of getting my virtual network up and running to a state where I am content in a state of virtual happiness. One thing I find myself quite often doing is deleting machines and creating new ones. To do this efficiently I have created a virtual machine clone hard drive where I can quickly and easily copy as many as a like and create new virtual machines with hardly any hassle at all. Here is what I do:
1. First Install Windows Server 2003/2008 and get the machine up to scratch (in this instance I use 2003 R2 SP2 64bit enterprise version), after installing the operating system it is a good idea at this time to install any critical windows updates or any other server additions you would like to install. In my case the majority of my servers will be acting in an application role, so at this point I add the application server role to the server. I also take the time to install the .NET framework 3.5.
2. After everything is ready to rumble, insert CD1 of your Windows Server 2003 disc (keep in mind 2008 already has the required tools installed in the system32 directory so you can skip this step).
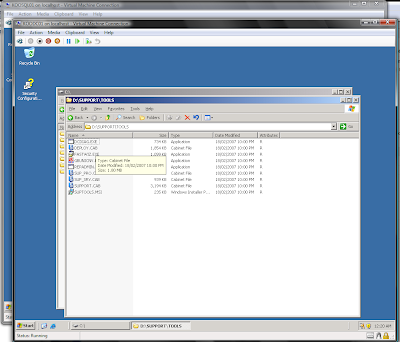
3. Open the support folder on your Server 03 CD and browse to \SUPPORT\TOOLS\DEPLOY.CAB.
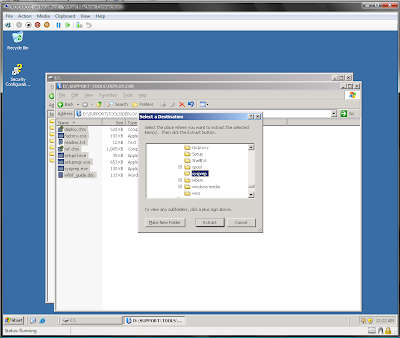
4. Once you have open the CAB file select all of the files inside and right click extract. Extract to Windows\System32\Sysprep (mainly for consistency with 2008, however you can extract it to wherever you like).
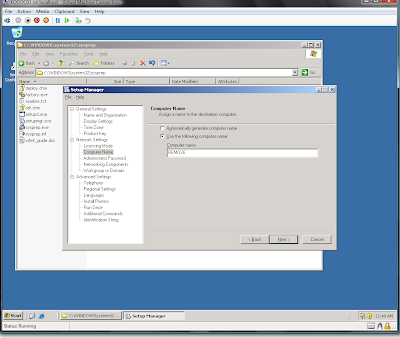
5. Now browse to the directory and run setupmgr.exe, click next and then next again to create a new answer file for your installation.
6. Select Sysprep setup and click next.
7. Select your version of Windows server and click next.
8. Change the option to fully automated setup and click next.
9. The next window will allow you to create the answer file for your installation. Fill out all the detail required except where you enter the computer name type in something like "REMOVE".
10. Continue to click next and fill out the details, under workgroup and domain you may chose to not enter your domain yet (I did this as my first machine was a Domain Controller and I didn't want to clone that VHD as being all DCs). You can add your PC to the domain once you have booted up for the first time.
11. Once you have completed all of the information and saved your answer file close the manager (clicking on cancel will close it, I suspect this is a bug).
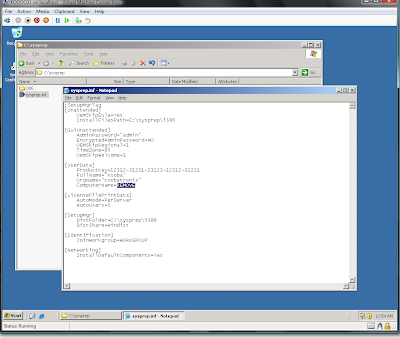
12. You will notice that there is now an answer file in your System32\sysprep directory. However the one that Windows actually uses when it boots up for the first time after sysprepping the machine is in the c:\sysprep\ folder. Double click on the answer file and remove the text that says 'REMOVE' this will prompt the automated install to stop at this point to ask you for a computer name, therefore enabling you to be able to rename your virtual servers at the point of initial installation.
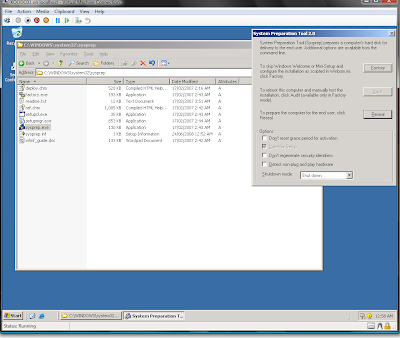
13. The final step for the system preparation is to go back into the System32\sysprep directoy and double click on sysprep.exe. Click OK and then click on 'reseal'. This will shutdown the machine.
Now the machine is shutdown, grab the VHD and rename it something like: 2003_Template or whatever you like and make as many copies as you want, when you boot the machine up it will automatically run the initial system setup as if it was a fresh machine, prompting you only for the Computer Name. Remember to add your new server to the domain and away you go! Happy virtualizing!
1. First Install Windows Server 2003/2008 and get the machine up to scratch (in this instance I use 2003 R2 SP2 64bit enterprise version), after installing the operating system it is a good idea at this time to install any critical windows updates or any other server additions you would like to install. In my case the majority of my servers will be acting in an application role, so at this point I add the application server role to the server. I also take the time to install the .NET framework 3.5.
2. After everything is ready to rumble, insert CD1 of your Windows Server 2003 disc (keep in mind 2008 already has the required tools installed in the system32 directory so you can skip this step).
3. Open the support folder on your Server 03 CD and browse to \SUPPORT\TOOLS\DEPLOY.CAB.

4. Once you have open the CAB file select all of the files inside and right click extract. Extract to Windows\System32\Sysprep (mainly for consistency with 2008, however you can extract it to wherever you like).

5. Now browse to the directory and run setupmgr.exe, click next and then next again to create a new answer file for your installation.
6. Select Sysprep setup and click next.
7. Select your version of Windows server and click next.
8. Change the option to fully automated setup and click next.
9. The next window will allow you to create the answer file for your installation. Fill out all the detail required except where you enter the computer name type in something like "REMOVE".

10. Continue to click next and fill out the details, under workgroup and domain you may chose to not enter your domain yet (I did this as my first machine was a Domain Controller and I didn't want to clone that VHD as being all DCs). You can add your PC to the domain once you have booted up for the first time.
11. Once you have completed all of the information and saved your answer file close the manager (clicking on cancel will close it, I suspect this is a bug).
12. You will notice that there is now an answer file in your System32\sysprep directory. However the one that Windows actually uses when it boots up for the first time after sysprepping the machine is in the c:\sysprep\ folder. Double click on the answer file and remove the text that says 'REMOVE' this will prompt the automated install to stop at this point to ask you for a computer name, therefore enabling you to be able to rename your virtual servers at the point of initial installation.

13. The final step for the system preparation is to go back into the System32\sysprep directoy and double click on sysprep.exe. Click OK and then click on 'reseal'. This will shutdown the machine.

Now the machine is shutdown, grab the VHD and rename it something like: 2003_Template or whatever you like and make as many copies as you want, when you boot the machine up it will automatically run the initial system setup as if it was a fresh machine, prompting you only for the Computer Name. Remember to add your new server to the domain and away you go! Happy virtualizing!
Friday, June 20, 2008
SharePoint List Print View... my oh my!
I have spent a lot of hours designing and creating complicated custom lists for clients (usually to replace communal excel spreadsheets). Many, Many times I have been asked by clients: "Jakob, how can I print this fantastic list from SharePoint." Quite often the only realistic option to print a decent view of the list is to export it into excel and then print it from there. However this doesn't really provide a Business Productivity focused approach to printing out lists my any means!
Our always loved and respected friends at Codeplex have included a very nice and fancy WSP solution file that can be deployed to a SharePoint farm that installs a very easily accessible "Print List" menu item to the "Actions" menu in lists. Excellent! This gives users a very simple and nice printable view of a SharePoint list as can be seen here:
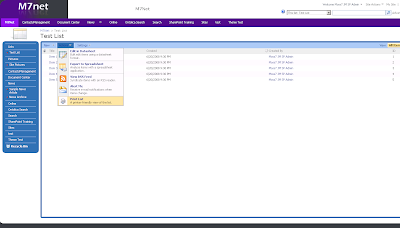
After Clicking on Actions and the Print List, the feature will give you an option to select one of your predefined views:

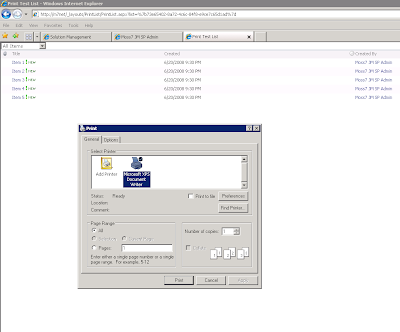
Next PrintList will display a printable view of your list such as:
What a fantastic tool.
To Install Print List, download the .WSP file from Codeplex.
Once you have downloaded the file run:
1. c:\program files\common files\microsoft shared\web server extensions\12\bin\stsadm.exe -addsolution -filename c:\\PrintList.wsp
then
2. c:\program files\common files\microsoft shared\web server extensions\12\bin\stsadm.exe -deploysolution -name PrintList.wsp -allowgacdeployment -immediate
That's it!
Now you will need to activate the feature on the site collection through Site Actions.
Woot!
Our always loved and respected friends at Codeplex have included a very nice and fancy WSP solution file that can be deployed to a SharePoint farm that installs a very easily accessible "Print List" menu item to the "Actions" menu in lists. Excellent! This gives users a very simple and nice printable view of a SharePoint list as can be seen here:

After Clicking on Actions and the Print List, the feature will give you an option to select one of your predefined views:

Next PrintList will display a printable view of your list such as:

What a fantastic tool.
To Install Print List, download the .WSP file from Codeplex.
Once you have downloaded the file run:
1. c:\program files\common files\microsoft shared\web server extensions\12\bin\stsadm.exe -addsolution -filename c:\
then
2. c:\program files\common files\microsoft shared\web server extensions\12\bin\stsadm.exe -deploysolution -name PrintList.wsp -allowgacdeployment -immediate
That's it!
Now you will need to activate the feature on the site collection through Site Actions.
Woot!
Wednesday, June 18, 2008
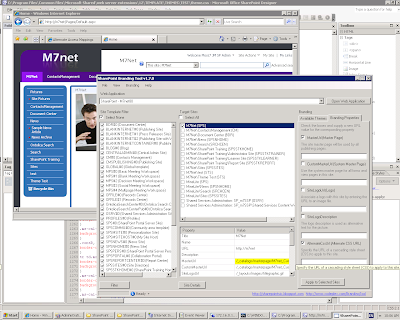
SharePoint Branding made easy.
Changing the Master page CSS and themes across multiple site collections and sites can be a real hassle, unless you change the default master page. However, you may want to use multiple master page, CSS and theme combinations across your SharePoint deployment.
WSS 3.0 also makes it tricky to actually change the masterpage and apply custom CSS.
Recently I had to create a custom look and feel for a client which involved creating a custom Master page and Custom CSS. I had implemented WSS 3.0 SP1 and a quick search on codeplex I found the SharePoint Branding Tool.
http://www.codeplex.com/BrandingTool
I have to say well done to the creators of this fantastic tool as it allows you to quickly and easily modify which sites use which master page and the excellent thing about it is that it allows you to modify WSS 3.0 implementations.
Here is a screenshot of it in action on my development box:

Thursday, June 12, 2008
In all seriousness...
You know what really grind my gears...
I am sick to death of corporations taking their IT solutions so lightly. I have now attended (once as a trainee and once as a trainer) two training sessions to do with PerformancePoint and SharePoint where the 'higher' level employees of the corporation have sent along general administrative staff eg: secretaries, admin staff, hr staff etc. to conduct high level SharePoint and PerformancePoint administrative tasks. I mean come-on, (no offence) secretaries posing as site owners and dashboard designers? Is this how seriously the CEO's and upper management take this type of technology?
I totally disagree with the way that businesses are approaching these technologies and their values to business productivity and business intelligence, yes they are designed to be end user friendly, however having personal assistants and secretaries design business models and content management policies and workflows is ludicrous. Now maybe it is the way that Microsoft is selling it's products but I just felt I really needed to get this off my chest.
I know I write my blog posts in a fairly comical manner (I assure you there will be beneficial technical data in there somewhere), however I take my job and passion very seriously and when I see occurances such as the above mentioned it really gets to me. Hopefully when their systems fall over, upper management will see the errors of their ways and employ some real architects, planners, engineers and administrators to properly implement these fantastic products that Microsoft have provided for us.
Its NOT Rude to Point...
Well I have spent most of today larning Microsoft’s new BI tool: Performance Point Server. It has been overwhelming to say the least, however the trainer has increased my knowledge of the very interesting world of business productivity and business intelligence.
Interesting stuff…
Will keep you posted.
Interesting stuff…
Will keep you posted.
Tuesday, June 10, 2008
Virtualization… welcome to the 21st century
I would like to start this blog post by quoting the great weird Al Yankovich:
“While your computers crashing,
Mines Multitasking,
it does all my work… without even asking,
I got a flat screen monitor 40 inches wide,
I believe yours says ‘etch-e-sketch’ on the side.”
I could go on but I think you get the point. Well I hijacked my gorgeous wife’s machine which was running my old e6300 dual core (my ex overclocked cpu) (thanks babe!) whacked in a new mobo and 8gb of ram and thought it would be a sweet idea to Install Server 2008 and build a virtual network! Yay!
After configuring and clicking around for a fair bit I eventually got everything working hunky dorrily (big up to my main man with the hyper v plan flo rida). I decided to go with this current setup:
Server 03 R2 SP2 - Domain Controller, DNS
Server 03 R2 SP2 - SQL Server 2005
Server 03 R2 SP2 - SharePoint Server 2007
Server 03 R2 SP2 - Performance Point Server 2007
Server 03 R2 SP2 - Project Server 2007
Server 03 R2 SP2 - ISA Server (still a bit iffy about this one)
Server 08 - Exchange 07 and Office Communications server.
Well I got a lot of configuring ahead of me and so far the machines are all bare and ready to be pounced apon.
wish me luck.
-Koobar
Friday, May 16, 2008
There and Back again.
Well Thanks to my buddy Edin I have migrated from google blospot to here (here was wordpress at bluehost)! woohoo! now all I have to do is some customising, and the site will be looking pretty shmiko in no time.
-Koobar
UPDATE: I have come back to blogger.
-Koobar
UPDATE: I have come back to blogger.
Friday, May 9, 2008
Parking Problem = Solved!
Recently we lost our parking at work. Its not that we couldn't find it, its more like it was taken from us. I decided to take matters into my own hands and purchased a new means of transportation.
My new 07' GSR600 Suzuki Motorcycle not only costs me less fuel, it cuts through traffic like a hot katana through cold evil. The parking problem is now solved.
Koobar 1
Mounts bay apartments 0
I will post pix some time soon.
Ciao for now.
-Koobar
My new 07' GSR600 Suzuki Motorcycle not only costs me less fuel, it cuts through traffic like a hot katana through cold evil. The parking problem is now solved.
Koobar 1
Mounts bay apartments 0
I will post pix some time soon.
Ciao for now.
-Koobar
Friday, May 2, 2008
My First Blog
Hi All,
I can't believe that I have been online for this long and never had a blog. Well here it is due to popular demand. I guess I never have seen the point of Blogging except to share my opinion. So here it is: Koobar's Point.
-Jakob Maciolek
P.S. Just to clarify this initially, my nick name is Kooba (Koobar online usually), this is derived from my polish name Kuba <-- Jakob (yakub) = Kuba. Just to get that all out of the way. Enjoy!
Subscribe to:
Posts (Atom)


